Friday, November 28, 2014

That One Time I Got A Little Carried Away...

I have a confession: I have been known, on rare occasion, to let myself get just a teensy bit carried away.

As in, gritting my teeth, kicking things out of the way, "No one's leaving here till we get one good (expletive) picture" kind of carried away.

It's a problem.

And it's especially bad at the holidays.

The 32 Most Hilariously Sassy Cards In The History Of Special Occasions

Take, for instance, picking out our Christmas trees last year (No, that's not a typo. Yes, I said treeS. Plural. I told you it's a problem.)


Poor Buggy Boy was only about 4 months old when I dragged him and his sensible (if not a little perturbed) father out into the ridiculously freezing temperatures and driving snow to a Christmas tree farm thirty miles away to pick out our trees. Because no, just stopping at one of the gazillions of roadside stands wasn't good enough.

It wasn't memorable enough. It wasn't fun enough. It just wasn't enough.

After all, this was Buggy Boy's first Christmas, and he was going to love it, dammit!


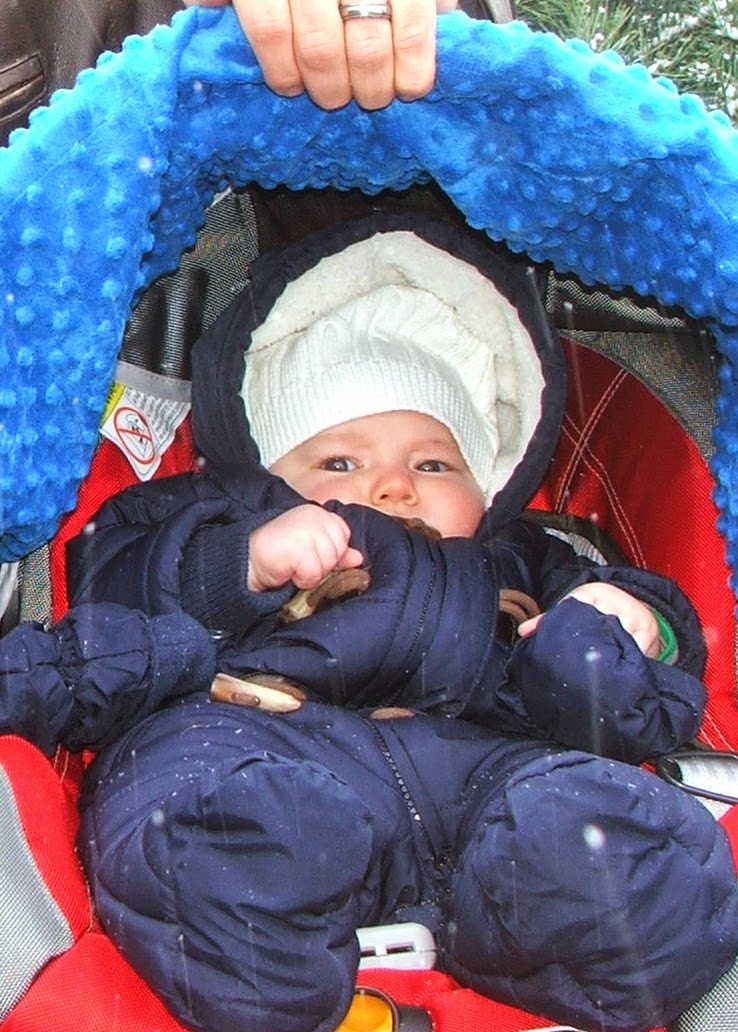
He did not love it. In fact, he hated it. I'm not kidding when I say it was absolutely freezing. And windy. And miserable. The wind and snow were so awful, we had to cart Buggy Boy around in his car seat just so he wouldn't keep getting smacked in the face with all the huge gusts.

He just sat there, strapped into his car seat, glaring at me over the collar of his snowsuit (which was too big and came up to his eyes, because heaven forbid anything should've gone right that day), while I hemmed and hawed over which tree would embody the rustic elegance of our dining room decor, and which would best suit the tasteful simplicity of our living room. I don't remember exactly, but I'm pretty sure Justin was huddled behind a heap of pre-cut douglas firs trying to stay warm while he googled divorce lawyers on his phone.


Suffice it to say, that was not my finest moment.

This year, however, I think I'm going to do things a little differently. I'm streamlining my Christmas spirit, if you will.

I'll still decorate the house, because I like doing it. And I'll probably still talk Justin into two trees, because frankly, this house was built for two Christmas trees. But I'm really going to try to rein in the crazy this year, and avoid taking my entire family down with me.

I will not engage in my usual battle royale with the faux garland for ultimate banister dominance.

I'm opting out of Elf on the Shelf (Buggy Boy isn't really old enough. And who thought adding a nightly homework assignment for parents that lasts literally the entire Christmas season was a good idea, anyway?).

If the outside lights don't emit a warm, inviting glow that is both cheerfully festive and tastefully elegant, I'll get over it. To be honest, you can't see them from the road, anyway.

And Christmas breakfast may or may not consist of a box of doughnuts and some oven baked bacon while I snuggle with my Bug. Because this year, I'd actually like to enjoy my family and the memories I get to make with them.

Here's hoping your holiday season is full of simple pleasures and many drama-free memories!

Sunday, November 23, 2014

Good Intentions: A DIY Bathroom Vanity on a Very Serious Budget, Part 3

We've been working on finishing up our diy bathroom vanity made from marine grade plywood. In case you missed the first two installments, you can read about the process here and here.

Well, it's finally finished...


And I love it!


Here it is totally naked. Absolutely gorgeous, no?


If you remember, we (And by we, I of course mean my dad) sealed the plywood using epoxy and varnish, sanding in between coats. Now it's smooth as glass, completely waterproof, and ready for whatever Chinese water torture Buggy Boy can throw its way. Victory! 


I love the way it turned out so much, I'm seriously considering doing my kitchen counters next. At $100/8' x 4' sheet of plywood, I literally couldn't get away with spending any less on another material. Bonus: it's totally waterproof, so spills and stains won't be an issue. 

Now if I can just convince my plywood guru to expand his countertop repertoire... 


So, do you love it as much as I do? Leave me a comment and let me know what you think!

Saturday, November 22, 2014

A Thanksgiving feast...

for my neighborhood friends. 


Goodbye, Autumn. You were beautiful while you lasted.

Sunday, November 16, 2014

The Gift of Time: 7 Ideas for People With Young Children


Before we were married, I used to spend many hours contemplating the perfect Christmas gift for Justin. I'd ponder, research, drop hints, reconsider, and then finally commit to something I knew he'd love and cherish for many a year to come.

Well, we have a kid now, so those days are over.

Now, I look him straight in the eye about two weeks till Christmas and ask him point blank, "What do you want this year?"

That was my plan again this year, and do you know what he said?

Do you?

He said, "I just want more time."

Ha! Who doesn't want more time? But how on Earth can I gift wrap it and stick it under the tree?

 Via

Isn't this the truth for all of us with a family, and jobs, and a house to keep up with? Sure, a new lens for my camera, or a sweater that isn't covered in spaghetti stains (I wish I could blame those on Buggy Boy. Those are all me) would be nice. But what we really need is time.

Quality time with the kids. Time with each other. Time to ourselves that isn't grocery shopping or a trip to the bank. Time to feel like a grown up again.

So, how do we do that? Well, I've got a few ideas.


Here's my list of the top 7 gifts of time for people with small children:

1. A gift certificate for a maid service
Dear lord, what I wouldn't give to have someone come to my house for an afternoon and clean. It wouldn't last long, but for those brief shining moments before someone throws up, it would be glorious!

2. A prepaid snow removal service
This one depends very much on where they live, but it would be great for people who deal with at least one good snowfall each year.

3. Passes to a movie/zoo/museum/other child friendly activity
But here's the kicker: you have to take the kids. Let the parents go out on their own (or better yet, stay in and take a shower and a nap) while you unleash their loud, sticky, over-excited children on an unsuspecting public for a few hours.

4. A trip to the day spa for a massage and a pedicure
Because conning your son into running his Tonka trucks up and down your back just isn't the same. And just fyi, this isn't just for moms. Dads, if you've never been, you're missing out. For. Real.

5. Along that same line, a prepaid appointment to a salon
Honestly, even if they don't need a whole new look, any parent can appreciate sitting in a chair by themself, sipping a cup of coffee and letting someone else wash their hair.

6. A nice, home cooked meal
I don't mean invite them over to your house for dinner. That would entail finding clean clothes and bribing the kids into behaving for 1-2 hours. That takes work. I mean drop it off at their house, without coming in, and pretend not to notice the weeks of unopened mail and tidal wave of toys spilling out the door. (Parents, remember the good ole' days right after your baby was born when everyone brought you food and expected you and your house to look like a mess? Why did that stop right when you had to go back to work and the baby went mobile?)

7. An offer to babysit for an evening
Because, seriously? I can't even remember the last time I was served a glass of wine and a hot meal that I didn't have to share, or got through an entire conversation with my husband that didn't involve an Elmo voice or a strained whisper so we don't wake the baby. It's a shame; he's a funny guy! Or at least he used to be. I can't remember.

As someone desperate for more free time, here's my plea to you: If you have a loved one with small children please consider forgoing the usual gifts this year in favor of a gift of time. I promise they'll appreciate it.

Fellow moms and dads, what did I leave out? Leave me a comment and let me know!

Monday, November 10, 2014

A taste of Ireland: Beef and Stout Stew with Herbed Dumplings

I'm a big believer that food has healing capabilities. Chicken soup for the soul. Starve a fever, feed a cold (Or is it the other way around? Does anyone really know?) There are times in life when the best medicine is a big bowl of comfort food.

As late autumn creeps in -- the days get shorter, the weather turns cold -- I crave a hot bowl of Irish stew.


Of all the places I've been (and really, the list isn't that long), Ireland is by far my favorite. I spent a semester there in college having the most fun I ever had in my pre-wife and -mommy life. But that's a story for another day.

Justin and I also honeymooned there. We rented a car and drove the entire southern coast, beginning in Dublin.


While ultimately wonderful and unforgettable, our trip started off a little rocky. And here's why:

Did you know that when you rent a car in a foreign country, they just GIVE you a car? No written test or clean driving record required. No pamphlet on rules of the road that might be different like, oh, I don't know, everyone drives on the other side! We knew this, of course, but it still amazed me how blasé the rental car people were. You don't even have to buy insurance, for heaven's sake!

Anyway, after we rented our (clown) car, we loaded up our things and went out in search of our hotel armed with only a map of the city and our newly wedded love for each other.


Approximately 27 seconds after leaving the airport parking lot, we hit our first bump in the road. Literally. While I, personally, find roundabouts in the United States to be somewhat confusing and inconvenient, tackling one while driving on the wrong side of the road in a stick shift that is also on the wrong side, is impossible. We ran directly over said roundabout and into a ring of very perplexed, and understandably angry drivers. Cue the white knuckles and accusatory screaming.

Somehow we survived and made it to our hotel relatively unscathed. The hotel was a converted castle complete with elaborately carved antique furniture and a roaring fireplace. It was beautiful. It was romantic. It was exactly what we'd hoped it would be when we splurged and booked it.

It was also unprepared for our arrival, three hours before check-in.

Jet-lagged, starving, and cranky from our thirteen hour red-eye flight and one death defying hour in the car searching for the hotel, I went to freshen up in the bathroom. When I came back, Justin was asleep in one of the oversized lobby chairs. I looked at my beloved, finally comfortable and dozing peacefully, his face awash with calm, and jabbed him hard on the shoulder. I mumbled something very soothing like, "Hey. I'm ready. Let's go."  Ah, to be young and in love.

We shoved our luggage at the mildly sympathetic desk clerk, and, lest we traumatize ourselves and the unsuspecting Irish public further, ditched the car in favor of walking.

It bears mentioning that it was cold. Very cold. See your breath, can't feel your feet, this country is stupid and I want to go home cold. In June. Thanks for that, Ireland.

After about an hour of walking around in circles trying to find some amazing four star restaurant I read about in our guidebook (I can't even remember which one now), we were hopelessly lost, starving, freezing, and seriously starting to reconsider this whole "till death do you part" thing. And then it started raining.

We ducked into the first door we found. Like a scene from a movie, it was perfect. A cozy,  rustic little restaurant with one last open table.

We ordered the beef and Guinness stew: a rich, hearty, dreamy bowl of warmth that instantly made everything better. A cure-all if there ever was one, and possibly even a marriage saver.


Modified from Irish Pub Cooking

Beef in Stout with Herb Dumplings

Ingredients:
2 tbsp corn oil
2 large onions, thinly sliced
8 carrots, sliced
8 oz mushrooms, sliced
4 tbsp all-purpose flour
2 lb stew beef, cut into cubes
generous 1 3/4 cups stout
2 tsp brown sugar
2 bay leaves
1 tbsp chopped fresh thyme
salt and pepper
canned biscuit dough*
2 tbsp chopped fresh parsley
  • Preheat the oven to 325°. Heat the oil in a large pot. Add the onions and carrots and cook over low heat, stirring occasionally, until the onions are soft (about 5 minutes). Meanwhile, place the flour in a plastic bag and season with salt and pepper. Add the beef to the bag and shake well to coat. 
  • Transfer the vegetables to a casserole dish with a slotted spoon. Add the beef to the pot and cook, stirring frequently, until browned. Add the beef and any remaining flour to the vegetables. Pour in the stout and add the sugar, bay leaves, and thyme. Cover and cook in the preheated oven for 1 3/4 hours. 
  • Sprinkle the biscuit dough with parsley and roll into balls. Add the dough to the casserole and return to the oven. Bake, uncovered, an additional 30 minutes. Remove and discard the bay leaves and serve. 
* The original recipe includes herb dumplings made from scratch using shredded beef suet. Ain't nobody got time for that, and we're fresh out of suet. We use canned biscuit dough instead. But if you're interested in the dumpling recipe, message me and I'd be happy to give it to you.


Enjoy!


Thursday, November 6, 2014

Old School Charm: My Thanksgiving Table


Welcome back! Today I'm sharing a little peek at our eat-in kitchen all dressed up for Thanksgiving. 

We don't really do fancy dinners at our house. Most days, we're more plastic cup and paper napkin people (Al Gore, if you're reading this, my apologies to the polar bears. We recycle, I promise!). Every once in a while, though, it's nice to go all out.


For Thanksgiving this year, I decided to go a little old school. As in, using vintage textbooks and literature in my decor. 


Autumn always makes me think of back to school season, and I thought it would be fun to add a bit of that spirit to my Thanksgiving table. 

I may be slightly obsessed with vintage books, and I have them lying around in just about every room in our house. What better way to add "old school" charm than with a collection of vintage books? So, I created the runner from a selection I had on hand. I added some antique brass candle holders and hurricanes, and some mercury glass votive holders. I also threw in some dried leaves for color, texture, and seasonal flair. 


For the place settings, I layered gold chargers with white and jewel tone plates and neutral linen napkins (donated by my mother who may or may not ever see them again. Thanks, Mom!)


The hutch got a festive fall makeover, as well. I kept it pretty neutral and added some mixed metals for a little sparkle. 


I hope you enjoyed our "old school" Thanksgiving table. Thanks for stopping by!

Monday, November 3, 2014

Read All About It! Removable Book Page Backing Tutorial


Welcome back for a fun tutorial on backing your display shelves with antique book pages!

I'm working on getting my house ready for Thanksgiving (Yes, it takes me THAT long), and I decided the giant hutch that lives behind my eat-in kitchen table was looking kind of drab. It needed a little life breathed back into it. And what screams LIFE! more than a selection of poems and short stories written by a bunch of dead people? 

I kid. I kid. I love the look of antique book pages displayed on an accent wall or made into something cool like a wreath. 


They're an easy way to add visual interest and texture while still neutral enough to blend in with any decor. And they're cheap. Win win!

I chose to adhere my book pages to sheets of foam board so I could easily remove them if I ever got tired of them. You can skip this step if you're super in love with book pages and there's no way you'll ever get sick of them. 

Without further adieu, let's get started!

For this project, you'll need:
  • A couple of vintage books with interesting looking pages (I chose two in different sizes and degrees of color fading)
  • A bottle of wine and a very large glass
  • A sharp knife, such as an x-acto or a box cutter
  • Scrapbooking adhesive squares
  • Foam board
  • A Ruler/tape measure
  • A Pencil
  • A large, thin board or yardstick
  • Clamps
  • Optional: Some kind of handsaw for cutting the foam board. A sharp knife will do if you don't have a saw.
Start by measuring the space you want to fill. The shelves in my hutch are removable, so I just took them out and measured the space behind them.


Next you need to trim your foam board to fit the back of your space. Using your ruler, measure and mark where you need to cut your board at both ends, then use the long, skinny board to draw a line the length of the board. This is your cut line.

Clamp the board in place along your cut line. This makes it so much easier when you go to cut the foam board. The clamps will keep it from moving around and guarantee you get a straight cut. 


Start cutting! A handsaw is faster, but a sharp knife will do the trick, especially if you've already clamped the boards in place. 


(Sorry for the blurry picture. Justin did this part for me while I tended to Buggy Boy. Apparently it's hard to take a picture of yourself cutting and cut at the same time, or whatever.)

Now that you have a perfectly trimmed sheet of foam board, you're ready for your book pages.

This next step is very important. Go to the kitchen and pour yourself a nice big glass of wine. If you're anything like me, you're going to need to it to work up the courage to actually destroy (gasp!) a book. 


Drink said wine standing at the kitchen counter, reading pages from your book, wavering about whether or not you can actually ruin a perfectly good book, check online to make sure it isn't a first edition that's actually worth a fortune because that would totally be your luck, finish your wine and decide what the hell, you can find another copy on Etsy for twelve bucks.

With your new found nerves of steel, select the pages you want to use. It takes a lot of pages, so give up the dream of preserving your book.


Run your x-acto or box cutter along the edge of your pages as close to the binding as you can. (Disclaimer: DO NOT consume a giant glass of wine and then use your lap as a book cutting table, unless you are a professional wine drinker like I am.) 

Once you have more pages than you could ever possibly need, cut some more. Seriously, it takes A LOT of pages.


Now you're ready to arrange them. If you're a normal human being, you can use the scrapbooking squares to adhere the pages as you go. If you're a total type A control freak, you can arrange them all the way you want them and then go back and gently lift one piece at a time to add the adhesive squares. Obviously, this is the way I did it. 


Ta-da! Your removable book page backing is ready to be installed. 


Hope you love it as much as I do! Back soon with a look around our home all decked out for Thanksgiving!